
티스토리 뷰
Swagger
스웨거(Swagger)는 Open Api Specification(OAS)를 위한 프레임워크
API들이 가지고 있는 스펙(spec)을 명세, 관리할 수 있는 프로젝트
Swagger의 주된 목적은 RESTful API를 문서화시키고 관리하는 것이다.
API 문서를 일반 Document로 작성하면 API 변경 시마다 문서를 수정해야 하는 불편함이 있는데,
Swagger 같은 Framework를 이용하면 이를 자동화할 수 있다.
Swagger의 5가지 기능
1. API 디자인
Swagger-editor를 통해 api를 문서화하고 빠르게 명세할 수 있다.
http://editor.swagger.io/#!/
2. API Development
Swagger-codegen을 통해 작성된 문서를 통해 SDK를 생성하여 빌드 프로세스를 간소화한다.
3. API Documentation
Swagger-UI를 통해 작성된 API를 시각화시켜 준다.
4. API Testing
Swagger-Inspector를 통해 API를 시각화 하고 빠른 테스팅을 진행할 수 있다.
5. Standardize
Swagger-hub를 통해 개인, 팀원들이 API정보를 공유한다.
node.js에 swagger 적용하기
1. Install
$ npm install --save-dev swagger-ui-express swagger-jsdoc "swagger-jsdoc": "^3.0.2",
"swagger-ui-express": "^4.0.0"2. Definition 정의
swagger에 대해 적용할 프로그램에 대한 정보와 path, api들 위치 등에 대해 정의한 definition을 정의한다.
/**
 * Created by wedul on 2018. 8. 30.
 */
'use strict';

module.exports = {
  swaggerDefinition: {
    // 정보
    info: {
      title: 'node js test app',
      version: '1.0.0',
      description: 'Make For node js test.'
    },
    // 주소
    host: "localhost:3000",
    // 기본 root path
    basePath: "/",
    contact: {
      email: "rokking1@naver.com"
    },
    // 각 api에서 설명을 기록할 때 사용할 constant들을 미리 등록해놓는것
    components: {
      res: {
        BadRequest: {
          description: '잘못된 요청.',
          schema: {
            $ref: '#/components/errorResult/Error'
          }
        },
        Forbidden: {
          description: '권한이 없슴.',
          schema: {
            $ref: '#/components/errorResult/Error'
          }
        },
        NotFound: {
          description: '없는 리소스 요청.',
          schema: {
            $ref: '#/components/errorResult/Error'
          }
        }
      },
      errorResult: {
        Error: {
          type: 'object',
          properties: {
            errMsg: {
              type: 'string',
              description: '에러 메시지 전달.'
            }
          }
        }
      }
    },
    schemes: ["http", "https"], // 가능한 통신 방식
    definitions:  // 모델 정의 (User 모델에서 사용되는 속성 정의)
      {
        'User': {
          type: 'object',
          properties: {
            id: {
              type: 'string'
            },
            age: {
              type: 'integer'
            },
            addr: {
              type: 'string'
            }
          }
        }
      }
  },
  apis: ['./routes/**/*.js'] // api 파일 위치들
};


출처: https://wedul.site/483 [wedul]
3. api 주소
각 라우터에 대한 정보를 적어주어야 swagger-ui에서 정의된대로 나온다.
/**
* @swagger
* tags:
* name: User
* description: 사용자 정보 가져오기
*/
module.exports = router;
/**
* @swagger
* /user/:
* get:
* summary: 사용자 정보 가져오기
* tags: [User]
* parameters:
* - in: query
* name: id
* type: string
* enum: [cjung, gglee, etc..]
* description: |
* 사용자 아이디 전달
* responses:
* 200:
* description: 성공
* 403:
* $ref: '#/components/res/Forbidden'
* 404:
* $ref: '#/components/res/NotFound'
* 500:
* $ref: '#/components/res/BadRequest'
*/
router.get('/', async (req, res, next) => {
const {id} = req.query;
let data = await userService.findUser(new UserDto.ParamBuilder(id).build());
if (data) {
res.json(data);
} else {
return next(new NotFoundError('잘못된 요청입니다.'));
}
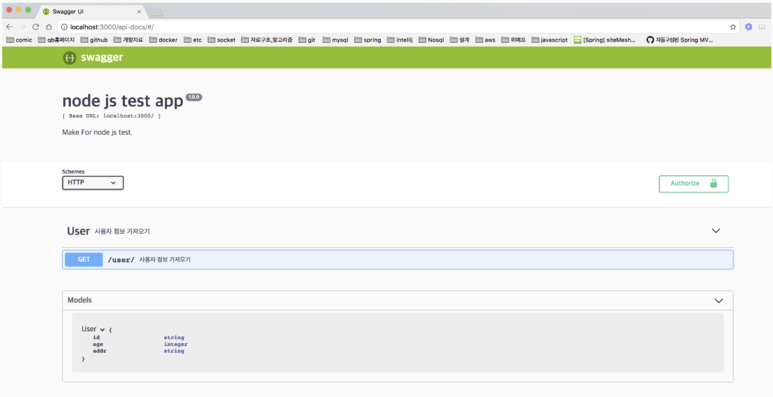
});4. app.js
app.js에 Definition을 정의하고 swaggerSpec이랑 swaggerUI관련 설정을 해주면 된다
const swaggerJSDoc = require('swagger-jsdoc');
const swaggerOption = require('./routes/swagger');
const swaggerSpec = swaggerJSDoc(swaggerOption);
const swaggerUi = require('swagger-ui-express');

app.use('/api-docs', swaggerUi.serve, swaggerUi.setup(swaggerSpec));
http://localhost:3000/api-docs/ 에 접속하면 접속한 화면이 나온다.
Express에 Swagger 적용하기
1. Install
$ npm install --save-dev swagger-ui-express swagger-jsdoc swagger-ui-express: express에 swagger ui를 쉽게 붙일 수 있다.
swagger-jsdoc: Comment 형식으로 문서를 작성할 수 있다.
2. Swagger Specification
swagger-jsdoc를 이용해서 Swagger 명세서를 생성한다.
const swaggerJSDoc = require('swagger-jsdoc')

// Swagger definition
// You can set every attribute except paths and swagger
// https://github.com/swagger-api/swagger-spec/blob/master/versions/2.0.md
var swaggerDefinition = {
  info: { // API informations (required)
    title: 'Hello World', // Title (required)
    version: '1.0.0', // Version (required)
    description: 'A sample API', // Description (optional)
  },
  host: 'localhost:3000', // Host (optional)
  basePath: '/', // Base path (optional)
}

// Options for the swagger docs
var options = {
  // Import swaggerDefinitions
  swaggerDefinition: swaggerDefinition,
  // Path to the API docs
  apis: ['./example/routes*.js', './example/parameters.yaml'],
}

// Initialize swagger-jsdoc -> returns validated swagger spec in json format
var swaggerSpec = swaggerJSDoc(options)
swaggerDefinition는 json이기 때문에 파일로 따로 분리할 수도 있고, production일 경우 basePath를 변경할 수 있다.
host는 변경하지 않으면 현재 Domain을 따라서 간다.
Security Definitions
JWT 인증을 사용할 경우 다음과 같이 swaggerDefinition을 수정한다.
var swaggerDefinition = {
  ...
  securityDefinitions: {
    jwt: {
      type: 'apiKey',
      name: 'Authorization',
      in: 'header'
    }
  },
  security: [
    { jwt: [] }
  ]
}
3. Writing the documentation
YAML형식으로 문서를 작성한다.
/**
 * @swagger
 * tags:
 *   name: Todo
 *   description: Todo management
 * definitions:
 *   Todo:
 *     type: object
 *     required:
 *       - content
 *     properties:
 *       _id:
 *         type: string
 *         description: ObjectID
 *       content:
 *         type: string
 *         description: 할일 내용
 *       done:
 *         type: boolean
 *         description: 완료 여부
 */

/**
 * @swagger
 * /todo:
 *   get:
 *     summary: Returns Todo list
 *     tags: [Todo]
 *     responses:
 *       200:
 *         description: todo list
 *         schema:
 *           type: object
 *           properties:
 *             todos:
 *               type: array
 *               items:
 *                 $ref: '#/definitions/Todo'
 */
router.put('/', isAuthenticated, todoList);
위 문서를 파싱 할 경우 아래와 같은 화면을 볼 수 있다.

4. Swagger UI Express
Express에 Swagger UI를 추가한다.
const express = require('express');
const app = express();
const swaggerUi = require('swagger-ui-express');

const swaggerSpec = swaggerJSDoc(options);

app.use('/api-docs', swaggerUi.serve, swaggerUi.setup(swaggerSpec));
이제 http://localhost:3000/api-docs 로 접속하면 위에서 봤던 화면을 볼 수 있다.
YAML
XML, C, 파이썬, 펄, RFC2822에서 정의된 e-mail 양식에서 개념을 얻어 만들어진 사람이 쉽게 읽을 수 있는 데이터 직렬화
양식이다.
YAML Ain’t Markup Language
YAML은 마크업이 아닌 데이터 자체를 중요시 여긴다는 뜻에서 지어진 이름이다.
Swagger는 기본적으로 YAML 포맷을 이용해 Docs 문서를 작성한다.
물론 JSON 포맷으로도 가능하지만, Swagger가 기본으로 채택한 YAML도 살펴볼 필요가 있다.
문법
주석 : #
# 이 라인은 주석입니다.
배열(list) : -
- Lil Dicky
- Rae sremmurd
- R.City
[Lil Dicky, Rae sremmurd, R.City] - 을 사용하지 않고 JSON의 []을 사용해서 한 줄로 배열을 나타낼 수 있다.
객체(hash) : :
name: Lil Dicky
birth: 1988
born: United States
{name:Lil Dicky, birth: 1988, born: United States}
JSON의 {}을 사용해서 한 줄로 객체를 나타낼 수 있다.
분류 - 공백(space)을 이용해 각 데이터를 구분
intro: Yeah bitch, check my profile. Perfect, but you are not.
profile:
  name: beenzino
  birth: 1987
  sns:
    youtube: https://www.youtube.com/channel/UCyFkumV0dfLxSY602sIYNvw
    insta: https://www.instagram.com/realisshoman/
  song:
    single: [Nike Shoes, Aqua Man, Up All Night]
    crew: [연결고리, '11:11']
tab 은 사용하지 못한다. 시스템마다 tab을 표현하는 방법이 다르기 때문에 공백만 사용.
JSON vs YAML
JSON
{
  "name": "hak",
  "age": 27,
  "programmer": true,
  "money": null,
  "blog": "http://sanghaklee.tistory.com/",
  "lang": ["JavaScript", "PHP", "Java"]
}
YAML
name: hak
age: 27
programmer: true
money:
blog: http://sanghaklee.tistory.com/
lang:
- JavaScript
- PHP
- Java
https://www.json2yaml.com/
https://www.json2yaml.com/convert-yaml-to-json
참고사이트
https://gongzza.github.io/javascript/nodejs/swagger-node-express/
'do > nodejs' 카테고리의 다른 글
| express login (0) | 2019.04.09 |
|---|---|
| Redis (0) | 2019.04.08 |
| Request, Response (0) | 2019.04.07 |
| dotenv (0) | 2019.04.05 |